|
HOW IT WORKS |
How Does 3D Printing Work?
|
3D printers allow you to turn a 3D model on your computer into a real life object. These can be models you or your students design, or they can be downloaded from the many freely available files out there. You then use special software to slice the model into layers and your 3D printer will melt plastic filament and lay it down, layer by layer, according to the file you have given it. That's it! You now have a physical object made from a digital model.
Here are some more details: |
Understanding 3D Printers
To really grasp how 3D printers work, I recommend watching a few videos of people using them and explaining how they work. I found the following to be the most useful:
How 3D Printers Work by National Geographic Kids is a nice little intro for kids.
What Is 3D Printing and How Does It Work? by Mashable
How To Use Your 3D Printer - Anet A8 (Tips, Tricks, and Upgrades) by austiwawa
Revised: 3D Printing: 13 Things I Wish I Knew When I Got Started by The 3D Printing Zone is a good video to watch to get some tips before starting your first print. Not all of these things will make sense for you to do right away - that's OK. Just take what tips you can from this video to make your life easier!
Step 1: Choose a Printer and filament!
Hopefully, your school will already have access to a 3D printer. If you want to know more about what features you should look for when shopping around, this video and this one (both by MatterHackers) explain a little about what your options are, but ultimately it is up to you. Some 3D printers are designed specifically for use with kids: Pen & Plastic has a review of a few that you might want to look into for using with kids or teens.
You will also need some filament. The most commonly available filament is PLA (Polylactic Acid). It comes in just about any colour you can imagine (even glow in the dark!) and will work with almost any 3D printer. It is easy for the beginner to work with, is biodegradable (eventually), and easy to find. The downside is that you may find that your prints are a little more likely to break if they are put under a lot of strain.
Step 2: Download and Install Software
A recommended paid software is Simplify3D. If you have access to it, you can learn how to use it here.
If you prefer free software, Cura is perfectly functional. Cura also has tutorials, manuals for Ultimaker printers, and much more.
When you install the software, you will have to tell it what kind of printer you have, and then select some settings for it. You should be able to find the settings in the manual for your 3D printer (if you don't have one, you can google your printer and find it), and if you are unsure about settings, just select your printer and leave the default settings it suggests.
Step 3: Setup a File You Want to Print
Find a file in one of the many sources available and download it. Start with something small and simple to get the hang of how this all works. Rome wasn't built in a day, after all.
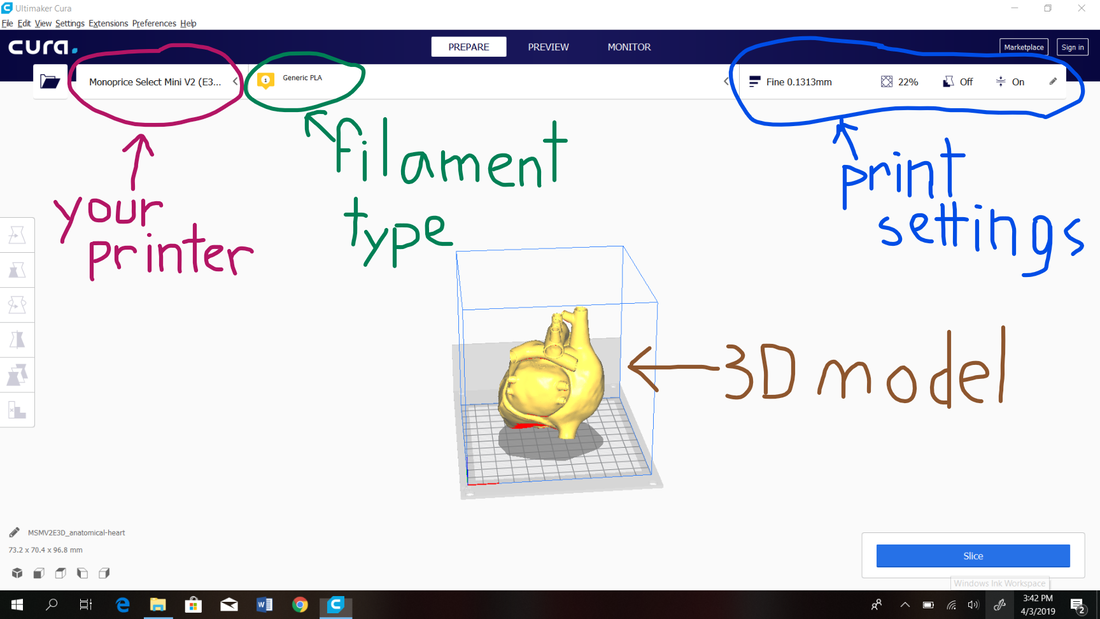
Open the file in your Cura or Simplify3D software (you may need to extract a zipped file first). You should see a 3D model of your print. You can also select the correct type of printer in the upper left and, directly to the right of that, the type of filament you are using to print.
Hopefully, your school will already have access to a 3D printer. If you want to know more about what features you should look for when shopping around, this video and this one (both by MatterHackers) explain a little about what your options are, but ultimately it is up to you. Some 3D printers are designed specifically for use with kids: Pen & Plastic has a review of a few that you might want to look into for using with kids or teens.
You will also need some filament. The most commonly available filament is PLA (Polylactic Acid). It comes in just about any colour you can imagine (even glow in the dark!) and will work with almost any 3D printer. It is easy for the beginner to work with, is biodegradable (eventually), and easy to find. The downside is that you may find that your prints are a little more likely to break if they are put under a lot of strain.
Step 2: Download and Install Software
A recommended paid software is Simplify3D. If you have access to it, you can learn how to use it here.
If you prefer free software, Cura is perfectly functional. Cura also has tutorials, manuals for Ultimaker printers, and much more.
When you install the software, you will have to tell it what kind of printer you have, and then select some settings for it. You should be able to find the settings in the manual for your 3D printer (if you don't have one, you can google your printer and find it), and if you are unsure about settings, just select your printer and leave the default settings it suggests.
Step 3: Setup a File You Want to Print
Find a file in one of the many sources available and download it. Start with something small and simple to get the hang of how this all works. Rome wasn't built in a day, after all.
Open the file in your Cura or Simplify3D software (you may need to extract a zipped file first). You should see a 3D model of your print. You can also select the correct type of printer in the upper left and, directly to the right of that, the type of filament you are using to print.
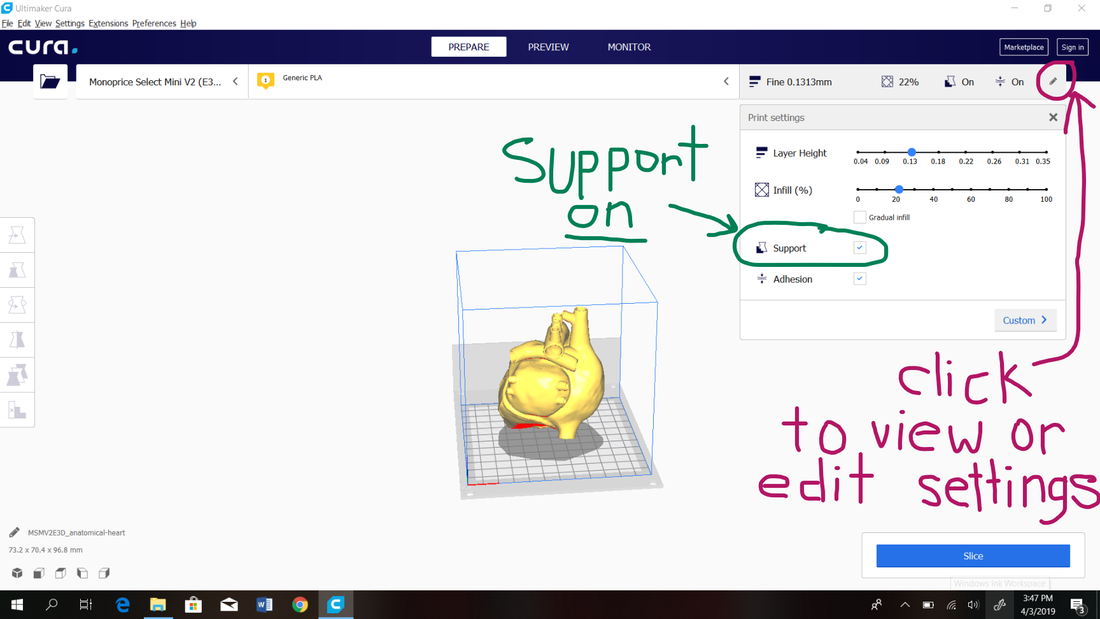
If your model looks correct, and you have the correct printer and filament selected, there is one last thing you need to check. In the upper right, click on the pencil to view and edit your print settings. Here you can do things like changing the thickness of each "slice", that is, each layer of your print. When in doubt, just leave the default settings. Cura selects the defaults based on which printer and filament you are using, so the work is done for you. What you really want to do is make sure the box next to "support" is checked. That will cause the printer to add structures to keep the print from collapsing as it is being made.
Once all that is ready, click the button labeled "Slice" in the bottom right and it will set up a file to use for printing!
Once that is done, the "Slice" button will be replaced with a box that tells you the following:
-How long your print will take to complete
-How much filament, approximately, you will use (in grams and in meters)
-A button to save your print to file.
Once that is done, the "Slice" button will be replaced with a box that tells you the following:
-How long your print will take to complete
-How much filament, approximately, you will use (in grams and in meters)
-A button to save your print to file.

You will notice from the example above that 3D prints can take a long time. If you shrink your print by scaling it down, or if you adjust your settings to make your "slices" thicker, the print will go faster. However, either of these options will lead to a less smooth print.
When you click the "save to file" button, you will have to choose a location to save the file that your printer can access. Some setups can print directly from a computer, but most will at least let you print from a file on an SD card. So plug your SD card into your computer, save the file there, then remove the SD card and put it in your 3D printer.
Step 4: Print your design!
Once your SD card is in the printer, you need to set up the printer! Follow the directions in the manual for your specific printer, but make sure to do the following:
-Load in the correct filament and clean any of the previous colour out of the nozzle.
-Make sure the settings on your 3D printer (such as nozzle temperature and bed temperature) are appropriate for your chosen filament. You should be able to find the specifications for your filament written on the side of the filament roll.
-Select the correct file from your SD card.
Then start your print! You will want to watch your print for the first few layers to make sure everything is working correctly, then you will only need to check in on it once in a while. Sometimes prints just don't work and the filament will start to go all over the place. Immediately cancel the print.
If something goes wrong, don't be discouraged from trying again! Check out some of the videos mentioned up top to get some tips on how to readjust and try again. In particular, this video from The 3D Printing Zone may be useful.
If your print works, congratulations! You just printed your first 3D object. Give yourself a pat on the back to give the printer time to cool down, then grab a thin metal spatula to gently pry your work off of the printing bed. More solid and sturdy prints can just be lifted off by hand.
Step 5: After printing
Your print will likely need a little cleanup before it is finished. Many 3D prints have structures designed to support them during printing, but need to be taken off later. You can learn how to do that in this video by SprintRay.
And you are done! You can now paint, use or display your new 3D print in any way you like.
The Next Step
Now that you can print, what comes next? You can explore Resources and Lesson Plans to get some inspiration on how to use 3D printing in the classroom. But the master goal (for you and your students) is to learn to design your own 3D models for printing.
This video from Chaos Core Tech shows you how to use the online computer assisted design software, Tinkercad, to make your own 3D models.
This video from Chaos Core Tech shows you how to use the online computer assisted design software, Tinkercad, to make your own 3D models.
